Posted by Kim on March 13, 2013, 10:46am
Yes, we're back with more fantastic tips from profile artist Jane! See her first round of tips here.Jane's tips on fancy pictures
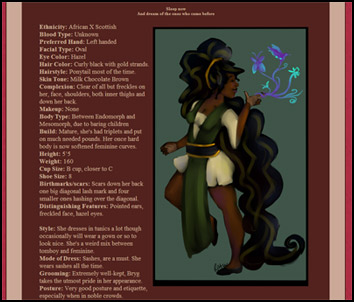 Bryg (played by KrypticRaven) makes phenomenal use of images throughout her profile, from simple character portraits, to a full illustrated menu of food she sells!
Basic code review
Let's review the basic code. This is the simplest way to add an image on your site:
Code:
[img]your picture url here[/img]
If you want to align the picture, which can be helpful if you want to have the picture
on one side, and let's say some text on the other:
Code:
[img align=left]your picture url here[/img]
Instead of left, you can also use right. And finally, you can center the image like this:
Code:
[center][img]your picture url here[/img][/center]
As I said last week, my favorite place to put images to link to is photobucket.
Using pictures as links
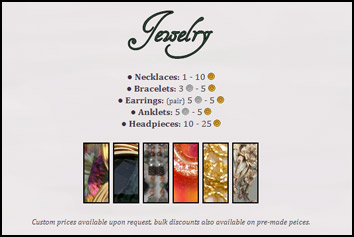
Freya Morris (played by iskait) created a custom gallery to show off all the pieces of jewelry the character wears. Each image links to a larger image. She's even used images of copper and silver coins to denote how much the character charges to craft different types of jewlery!
For example if you use a crop-out and want to link it to the original (big) picture.
You could use this little effect to show wares your character is currently selling, or even the clothes he/she wears without cluttering your profile. Or simply to make your site look not as boring.
Here is how to turn an image into a link:
Code:
[url=link here][img]url of the picture here[/img][/url]
Here is a version that you can play with, to see what I mean:

 An example of cropped out images, linking to the fullsize versions. What an awesome way to show off your character's wardrobe!
As you can see, just using pictures on your RPR gives you so many wonderful possibilities to prettify your site. If you do not have any pictures, and no money to commission them, there are a few artists that are wiling to draw your character for free. Check out this forum. Of course, always be nice.
Creating images with transparent backgrounds
If you have a sketch (black/white) you can easily make it transparent with GIMP. See the first tutorial for instructions on obtaining a free copy of GIMP.
When commissioning artwork, I mostly ask for a transparent background. If the artist does know about it before he/she starts, its not much hassle. Requesting it afterward could be tricky.
If you already have a black and white image, making it transparent is very easy.
Open the sketch in GIMP, and open the menu “Colors” and then click “Color to alpha”. If you try it on colored pictures you will see, that it works as well but bleaches your picture or even worse. But a try never hurts, if you do not save it.
Cropping and framing images in shapes other than squares
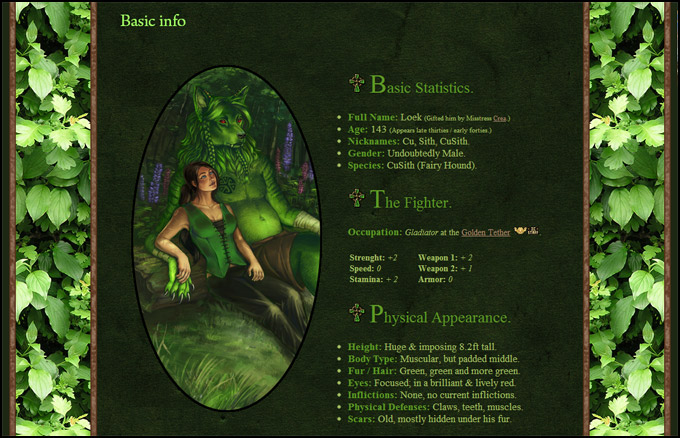 Cusith (played by GreenCinders)'s profile is decorated with an image that has been cropped into an oval, and framed with a dark brown border.
Note: Framing cube shaped pictures is easier than rounded ones. But it is not impossible.
When I made my own profile, I used a complicated method to frame rounded crop-outs, until Eyadi, a friend of mine that is an artist, told me about a method that is easier. Gladly, she used GIMP as well.
I want to thank her for this tip.
- Open the picture you want to use for your crop-out in GIMP
 Use the ellipse select tool to select an oval you want.
- Copy it and then paste it into a new transparent image so you have the oval, separate.
 Use the magic color wand, and click into the picture with the oval.
- Go to the menu "Select" and choose "Invert", so just the oval is selected. Now in the same menu, choose "grow".
- Let the selection grow by 1 pixel or 3, it depends on what you want. This will help to remove ragged edges of color.
- Ctrl + X, and the oval is now a few pixels bigger, and empty.
- Fill it with a color, and press Ctrl + V and the cropout is in the middle of the colored frame.
- It should align itself, and now simply save it as a png, and say yes when it asks if you want to put the layers together.
- Upload the image to your favorite image site, such as photobucket, and place it onto your profile with the BBCode at the start of this article. You can wrap it in a link to the full, uncropped image as well!
And that's Jane's tips on making more creative use of all your character reference images. There's one more tutorial packed with tips for prettifying your basic profiles coming next week, and you don't even need to have any art to make use of it.
If you try these techniques out, please leave a link in the comments so we can marvel at your fancy profile!
Comments
TheLily

March 19, 2013
5:56pm
Hey, Lily!
What Brain?
I got an amazing idea. It won't be hard or time consuming at all!
I'm in the middle of class. Have this idea later.
No! This is really important Lily. Like, so important if you don't listen to me, I'll stop working forever. Listen to me, Lily. I'm your brain, I know what's good for you!
No, no my brain doesn't. This took four times as long as my brain insisted. (18+ images!)

I have heard from others that its is addicting, and personally I agree.
Maybe BBcode is the new 'knitting' ?")
Maybe BBcode is the new 'knitting' ?

@kalirigby89 I like that you added an overlay to your crops, so that they all have the torn up edges look!

So I used pictures-as-links...as-profile decor and a content divider. on this dude. I'm pretty okay with this.
Still picking away, but these are BOTH very helpful tutorials! This is weirdly addicting...
Still picking away, but these are BOTH very helpful tutorials! This is weirdly addicting...
I love Roze's 
TheCoffeeWolf
March 13, 2013
6:12pm
So I got poked to post up some of my work due to Jane's helpful gimp
Your text to link here... enjoy my first page
Your text to link here... enjoy my first page

I'm also a fan of having aligned images surrounding text - love all the examples put up so far!
I looooove Yarla's profile.

It is wonderful how nice and easy it is able to do all on your own with help from a freely available tutorial! 

Holy poop! These tops are fabu I tried some tips on Yarla! I really wanna try the picture links the would probably be neater!
I tried some tips on Yarla! I really wanna try the picture links the would probably be neater!
Thank you so much Kim
 ! Great tips! I've been working on this with Alonzo to get it just right!
I was wondering who that friend was! I will go add it.
TheCoffeeWolf
March 13, 2013
12:33pm
Fantastic as ever!!
Oh, the friend that gave me the tip was "Eyadi" - it took the link out of the tutorial 

Another awesome tutorial! I can't wait to try some of this out! ")
TheLily
March 13, 2013
11:32am
Oh yay. Things I do already. This makes me feel smart  Thank-you.
Thank-you.

Time to have even more fun with Quincy's profile! Thanks, again, for this resource, it's totally appreciated.

I am a huge fan of having aligned images to flank lovely text! A couple days ago I painted a portrait for Heimdall that I think does the trick quite nicely on its stats page. http://www.rprepository.com/c/heimdall/5824
I'm not the best at prettifying profiles... in fact, I'm so indecisive, I'm always changing things around. My tip is to work on one page at a time. That way, when you change your mind in a couple hours, you only have to redo one page instead of all of 'em.
I'm not the best at prettifying profiles... in fact, I'm so indecisive, I'm always changing things around. My tip is to work on one page at a time. That way, when you change your mind in a couple hours, you only have to redo one page instead of all of 'em.
Jane
April 7, 2013
5:05am