Posted by Kim on March 6, 2013, 11:11pm
One of the goals of the RP Repository is to provide great looking character profiles to everyone, even if they don't know a drop of coding. Yes, good ol' drag and drop has been the name of the game around here for nearly 3 years. Easy peasy!But recently, there's been a movement amongst a small group of members to put the "advanced" back into profile making. These intrepid designers have been taking advantage of every option offered to basic users, to take default templates and make them look amazingly custom.
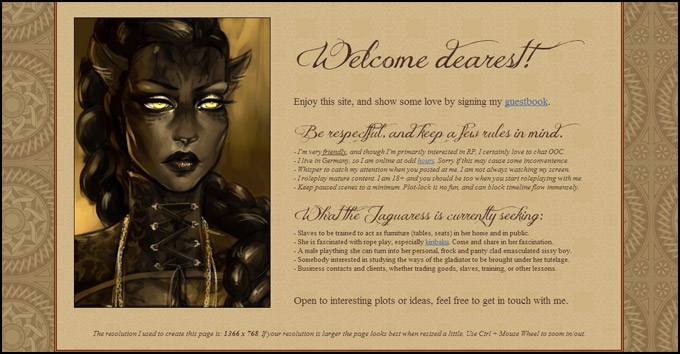 This is one of the many profiles that Jane has customized. Notice the use of unusual fonts -- she's about to teach us how to do that on our own profiles!
We're very lucky that Jane, one of the ringleaders of this movement, has agreed to share some of her secrets for fancifying profiles! She has written three tutorials for us, to be published over the next few weeks.
Jane's tips on fancy titles (new fonts/colors)
Every template for character pages has a certain title font that is easy to read and suits the profile.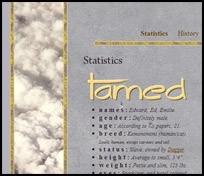 An example of a custom font in use on a free template. This profile belongs to Tamed (played by EdtheNeko)
You could try using the “font” tag, but this is likely to only work for you. Why? Because web pages can usually only display fonts that are installed on the viewer's computer. So you will see the fancy font you just downloaded, but no one else will unless they happen to have downloaded and installed the same one.
But you can ensure everyone sees the beautiful font you want by using an image instead of typed-in text. Just use your favorite image editing program to make a picture of the text in the font you want to use, and implement it with BBCode.
Code:
[img]your picture url here[/img]
If you want to align the picture, which can be helpful it you want to have the picture on one side of the profile, and maybe some typed text on the other, you can use BBCode like this:
Code:
[img align=left]your picture url here[/img]
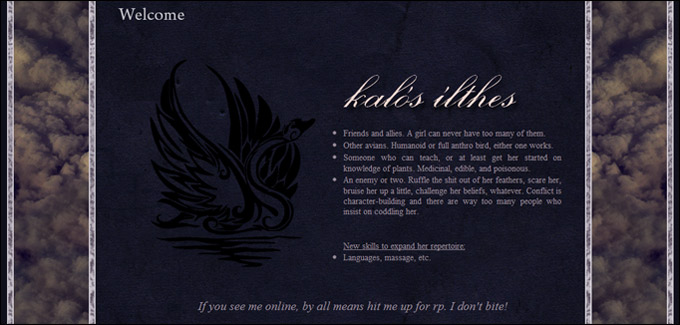 Here we see a custom font image being displayed with BBCode, with another image aligned to its left. This profile belongs to Anya (played by Twilit)
Instead of left, you can use right as well. Or, put it in center tags to center it:
Code:
[center][img]your picture url here[/img][center]
Creating the fancy title image
What you need:
- an image editing program (ie. GIMP) to make your picture (download for free here).
- a font you enjoy that suits your site (find some free fonts here).
- colors for your header that go well with your profile.
I personally prefer photobucket, because it is easy to use and you have much space.
At first, please download GIMP (or if you already have a program, feel free to use your own.)
When you have decided on a font (or several ones) that would suit your character, we can start.
Installing new fonts
Q: How do I install a font?
A: You download the font, and copy & paste the (.ttf)-file into your windows font-folder.
If you restart GIMP, the new fonts are accessible and you can use them without a problem. It can be helpful, if you write down the names of the fonts (if you have to many) so its easier to find them later.
Picking out a color
For the colors you want to use for your header, you can pick any color you want.
The code for the many different colors can be found here.
 I would recommend you use a color that is already used in the template. (ie. use the pipette-tool to pick up a color from a screenshot you took of your profile.)
 Once you have sampled the color that you would like to use for your text, you can find its hex code by clicking the sample swatch of it in the tool menu. It will open a window that has a section in it labeled "hex code." That is the information you will need to use this color.
Tip: You can make your normal text in a different color too, using the hex-name of the color and some BBCode.
Code:
[color=#ffc74c]insert text here.[/color]
Step-by-step image instructions (for GIMP)
- Open GIMP, and then choose file > new
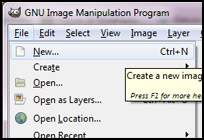
- Click More Options, and make sure the background color is set to transparent. Then click okay.

 Use the button with the big A and then click and drag a square on the transparent background of the canvas.
- That is where you will input your text. Just pick the font and the color and type.
 Use the rectangular selection tool to draw another box around your text. Then go to the Image menu, and choose crop to selection.
You might want to try to cut your “image-font” out as close as you can so it is easier to align later.- Save the image as a .png (This will allow you to use the transparent background)
- Upload the image to somewhere like photobucket, and then use the BBCode above to add it to your character profile.
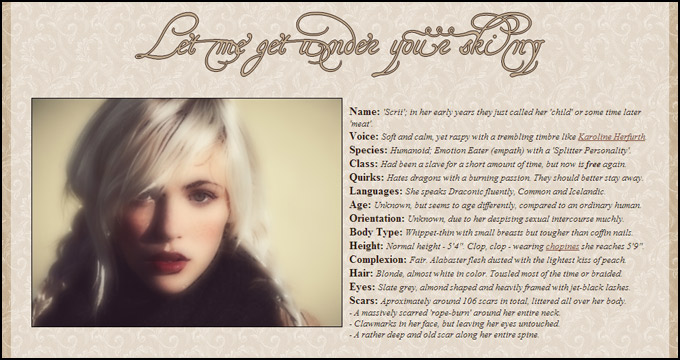 Another example of title fonts put to good use. This profile belongs to Scrii (played anonymously)
And there you have it! Jane's tips on how to create strikingly fancy, grungy, or moody titles for your character profiles.
Have a character profile that uses this technique? Leave a link in the comments, so we can all gawk!
Comments

Tige, thats BEAUTIFUL!
And thank you all *blushes*
And thank you all
*blushes*

Very nice tutorial!

This is awesome!

Thanks for the extra font resource, BloodLilly! That's seriously cool.
Dog, did you find a font with bricks already built in, or did you overlay that pattern yourself? I love that it shows that this technique can be "macho" as well, since for most people, "fancy font" makes images of flowery cursive spring to mind.
Dog, did you find a font with bricks already built in, or did you overlay that pattern yourself? I love that it shows that this technique can be "macho" as well, since for most people, "fancy font" makes images of flowery cursive spring to mind.

Aw man, aw man! I've been wanting to awesome-fy my profiles as of late, so I've been super psyched for the release of the first tutorial.  Thank you so much, Jane, for generously offering your insights and expertise in prettifying our characters' pages!
Thank you so much, Jane, for generously offering your insights and expertise in prettifying our characters' pages!

All right, I tried. Here goes!:
http://www.rprepository.com/c/tige
http://www.rprepository.com/c/tige
I was actually working on some of my profiles just yesterday while admiring some of the amazing profiles done by other users on here. Definitely looking forward to this series of guides. Jane does some amazing work.. Skin, for example, is such a brilliantly done page.
EdtheNeko

March 7, 2013
8:39am
^-^ Yes Jane is very good at editing these profiles, she should be proud of her work. 
BloodLilly
March 7, 2013
7:49am
Also, I have stumbled on Font Meme which is a generator for a load of text. From movies, albums, theme related, and even your every day text.
You wanna go find the text you want, download it located under the text window and then upload it. Thankfully it does an automatic background so you wouldn't have to worry about that and it allows you to change the colors as well.
You wanna go find the text you want, download it located under the text window and then upload it. Thankfully it does an automatic background so you wouldn't have to worry about that and it allows you to change the colors as well.

Ooooh, those profiles are amazing! Thank you so much for the tutorial, Jane! Can't wait to try it out on my own characters!
Thank you Sanne. I hope that this will help to make their profiles pretty, too. When I started with RPR, I didn't know how many possibilities I had to customize a profile.
I hope that this will help to make their profiles pretty, too. When I started with RPR, I didn't know how many possibilities I had to customize a profile.

I absolutely love the profiles Jane makes! I hope this will help everyone who wants to make their profiles super pretty with BBCode. ")
Dog
March 7, 2013
12:10pm
Thanks everyone!